
How-to
Garden Stories
DIY Living Plant Wall
From time to time, we need to replant the Living Wall at the Grunsfeld Children’s Growing Garden. That leaves us with four empty walls. So we get creative and make an “alternative” living wall.

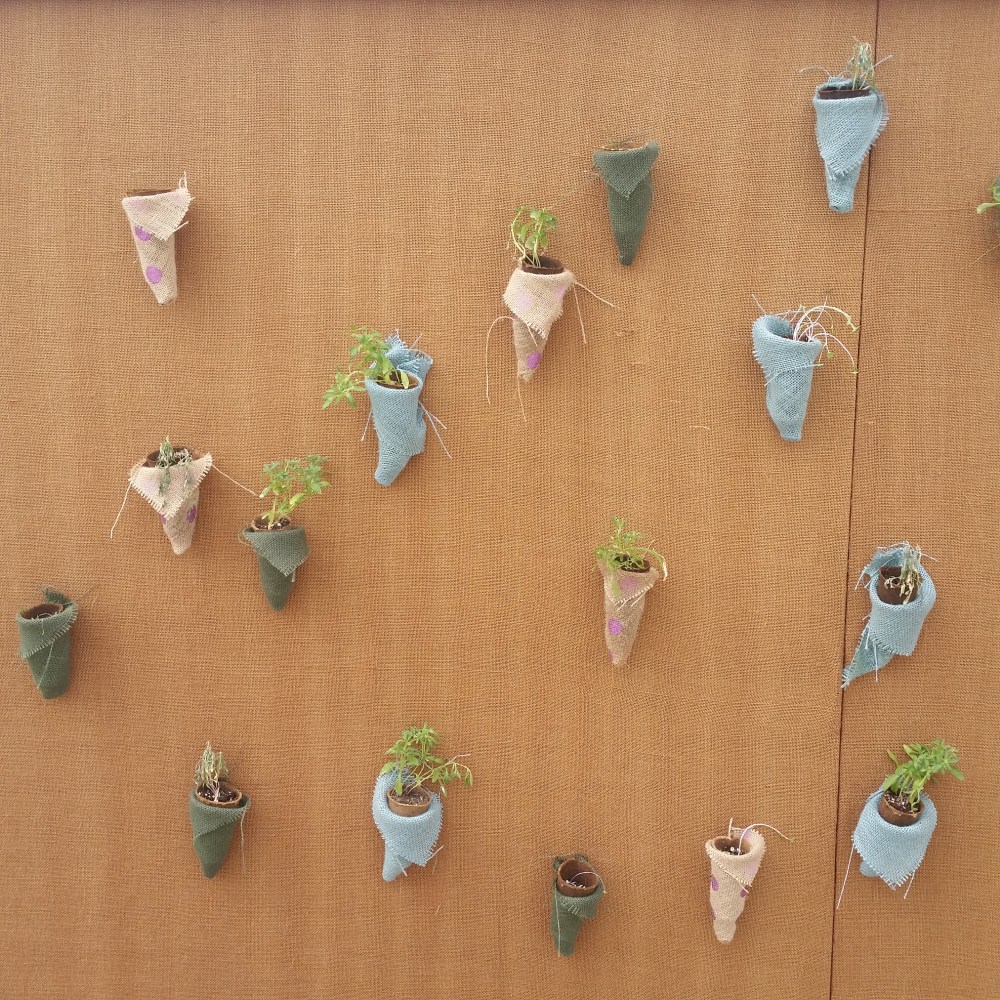
These burlap pocket planters contain alyssum, lettuce seedings, grass, and coriander.
Here's what we did one recent spring: Our carpenters covered foam boards with brown burlap and installed these panels on the living wall frame where the plant cells had been removed. Students from the Garden’s Nature Preschool planted seeds and transplanted seedlings into small pots. We placed the plants into colored burlap planters and pinned them to the foam walls, and voila! We had a vertical garden again.
You can do this at home. Making planting pockets is simple and fun.
1. Plant seeds or transplant small plants and let them sprout. We used biodegradable Fertilpots, but you could also start seeds in egg cartons, newspaper pots, or plastic pots.
2. Cut the burlap into squares that are twice as long and wide as the pots.

Our Fertilpots were 4″ tall, so I cut the fabric roughly into 8″-x-8″ squares. This does not need to be exact.
3. Fold the square in half diagonally and sew a seam along the side. You can use a heavy duty needle with a sewing machine or do this by hand with a darning needle. It might be possible to use a hot glue gun to make the seam, but I did not try this.

I used a sewing machine because I made more than 100 of these. They could be sewn by hand.
4. Turn the triangle inside out to form the pocket. Slip the planted pot into the pocket and get ready to hang it on a wall.

The seam side of the pocket is the back, and the pointed front top can either be folded down or cut off.
5. To hang on the wall, pinch the extra fabric so the burlap fits snugly around the pot. Fold down the point in front or cut it off—your choice. Push a long pin through the pot and the fabric and pin the pocket to the wall. (I had pins used by our horticulturists to propagate cuttings; you could use T-pins or other pins with large heads.) You could also lace a ribbon around the top of the pocket and cinch the fabric, then hang the planter by the ribbon.

Gathering the extra fabric will help hold the pot better, and it will look neater on the wall.
Students in our Nature Preschool enjoyed helping to grow the plants and pin them to the Living Wall. Each child wanted to place his or her planter next to a friend’s planter so they could grow close together.
Just for fun, we experimented with some other kinds of planters, including plastic bottles and shoes.


If you want to try growing a plant in a 2-liter bottle, cut a rectangular opening in the side of the bottle, poke six to eight holes on the opposite side for drainage, fill with soil, plant, and hang it up.
The preschoolers are fascinated by the soda bottle planter. They like to look in the round opening on the side. The toddler shoe makes everyone smile. We may add more surprising planters over the next few weeks, just to keep it interesting.
If you decide to try something like this at home, be advised that the small pots need to be watered frequently (ours need watering daily) because they tend to dry out faster than larger containers. It’s a good project for young children because they will get to do a lot of watering without harming the plants.

